Hey there! My name is Crafty Kitty and I'm here (mostly) to do crafts! (Big surprise) I won't bore you with a long introduction but I will tell you I'm a Stay at Home Mom (SAHM), married 7 years with a lot of time on my hands :) I like to fill that time with crafting and thought.. Hell I like the internet and people, why not share my various crafting adventures with the world. So here I am and there's that. It's nice to meet you :)
This first post (aside from saying hello) is also to help new Crafters begin their journey. If you're anything like me, you might struggle with starting. Perhaps you want to craft but feel overwhelmed at the prospect of starting. The various options for crafts, tools and mediums alone can be enough to make someone put off even starting a craft over and over again. I get it, always remember these activities need to be fun, if they arn't fun then you shouldn't be doing them.
To start off I've made a list (with pictures) of the basic "Tools of the Trade". Keep in mind as you scroll through these that I've spent YEARS accumulating these items. I suggest 3 things: Buy the bare basics, accumulate over time and recycle and reuse as much as you can. Look at craigslist ads as well, often you might find people throwing out crafting goods like: Paint, canvas, old paintings (they can be repurposed), crafting supplies, yarn, teaching supplies, really anything! Also keep in mind that ANYTHING can be a craft. The Thrift store, garage sales and facebook pleas for old unwanted good are going to be your best friend. Now with this in mind! On with the list:
Things you MUST have (in my opinion). You can find these items at Dollar Stores, Target, Craft Stores, Hobby Lobby, Craigslist ads and Thrift Stores
1.) Scissors - These are your best friend. I can almost promise that you will never do a craft without scissors. They go for as cheap as a dollar to 15 dollars and up for a really good pair. I have a lot of cheap pairs >.<.
2.) School Glue - It can be used for nearly anything and will likely have a role in every project you do. If you can't afford Mod Podge then you can use school glue. If you don't have a glue gun, school glue does just as well in most cases. Alternatively Fabric glue is just as effective. Especially for... well Fabric projects. You can get it at the Dollar store for a buck and usually no more then 2-4 dollars at a regular store.
3.) Paint & Brushes - Like the previous two, you will probably use these in every project you do for one thing or another. I have a wide variety of colors and brushes but if you're on a budget you can pick up the Primary colors (Blue, Yellow, Red) and a couple brushes for fairly cheap. I'll also be doing a color mixing tutorial soon :) So look for it. Paint will range from $1-10 Bucks and up depending on the paint. Mine were $6.99 for a pack of 6 colors. Brushes run about the same for a large bag of various shaped brushes. Always check the Dollar Store.
4.) Basic Sewing Kit - I don't own a sewing machine (though I really do want one, ahem, husband...) But even if and when (ahem... when o.o) You won't see me doing a tutorial without showing you how to do it by hand. A basic sewing kit is needed in my opinion, some crafts require basic sewing and you never know when you might need a needle or pin. I picked this up at ... where else... the dollar store.
5.) Paper - I suggest something thick enough to withstand paint. That usually means it can deal with markers and other things without bleeding and will last. Pictured here is cardstock which I got at.. the Dollar store 6 pages for a dollar and a cut those pages in half. You'll use paper a lot in your crafts.
~~~~~~~~~~~~~~~~~~
Below, is now a list of things that while you don't NEED to have them (like the above), they are useful and generally you will see me using them in tutorials. You can find them at the same stores as the above.
1.) Glue Gun - I would die without my Glue Gun. Literally, fall to my knees and die. I use it in every project and the only reason it's not listed up with the essentials is that I know that not everyone wants to invest in a Glue Gun of their own. Now, I will strongly suggest you pick one up. Mine was $4.99 at Target and the glue sticks cost me $2.99 for a pack of 100. Well worth it.
2.) Staple Gun - Go ahead take a moment to yourself to think about this one. I know it seems like a random item but it's very useful for wood based projects and even those involving card board. The above was $10-15 bucks at Harbor Freight and I've used it many times over the years.
3.) Ribbon - This is a basic tool for jazzing up anything in crafting. You can find ribbon nearly anywhere and usually for as low as cents and up.
4.) Yarn - Ribbon's thinner cousin. You can use yarn in a variety of ways, though you likely won't see me doing any knitting or anything like that. But to explain how useful this material is... Last year our tree was made out of Yarn.
5.) Fabric - I keep a collection of ruined shirts, pants and other garments my family has destroyed. I use these for projects when I need a certain pattern or there's a project that calls for fabric scraps. I suggest you start keeping the same stock. You can also find great deals on clothing at the Thrift Store which is where I get some of the fabric I use. Otherwise you can hit up deals at places like Hobby Lobby, Micheals, Joannes and other Craft supply stores.
6.) Tape - Good for a temporary fix or just holding something in place. Dollar store, two reels for a buck.
7.) Trinkets - Various knick knacks and whatsists. Hairbands, feathers, metal twine, hemp twine, color swatches from home depo and other little things, these are all accumulated items from places like the Swap Meet, Dollar store, Thrift store, target, Hobby Lobby and various other places. You never know what you might need or what you can create when using the random items you can find at these places.
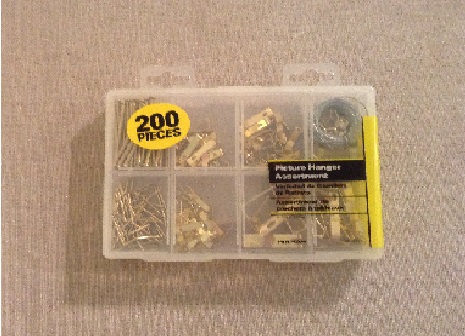
8.) Wall Hanger Assortment - $5.99 at Home Depo, it's worth every penny and I would have paid double. I love to decorate my home and many projects require you install your own hangers, this set covers the need for hooks and nails very well and will last for 6 months to a year if not longer.
9.) Paint Pallet - Great when your painting and if you don't like to use newspaper instead (which is what I do, though I own every other craft supply so why not this one) You can find the plastic ones at Target or the Dollar store, also at craft store. The price varies depending on the place but you can usually pick them up for less then $3.
~~~~~~~~~~~~~~~~~~
Moving along here's a group of items that I find is the most useful and best place for any novice to start. Recycled goods are great for limitless ideas and projects. I collect these items and store them until their needed, I also use Facebook to broadcast when I need certain items (Magazines, bottles, ect) and I've found it's a great resource. I suggest you collect the following:
1.) Cardboard - You can turn cereal boxes and electronic packaging into art. As long as one side is blank (or you don't mind the print). I have a small surplus of cardboard I keep on hard because it's very handy.
2.) Broken/Unwanted Jewelry - Beads are beautiful on anything and are often a great touch to any project. I buy cheap jewelry from Thrift Stores and Dollar Stores and then save them for when I can re-purpose them.
3.) Magazines - Terrific for collages, backdrops, filling, or just browsing for ideas. Magazines are wonderful for a variety of things and are used in many projects that I've done (and will do again for you Lovely people :)
4.) Newspaper - Great for artwork and everything else a magazine can do, newspapers are also the ideal clean up material. It's great for spreading out before you paint or work with dyes or glues. Usually free to your door step or no more then 50 cents to a dollar.
5.) Paper Rolls - From toilet paper or paper towels, paper rolls are great for saving. I have a number of crafts I've done using these guys. They are worth the small amount of space that alot of them can take up.
6.) Shoeboxes - You never know what ideas will inspire you with a shoebox. And if you can't think of anything keeping them around for the cardboard itself is well worth it.
7.) Plastic Bottles - Just like the others, these can be used for an endless array of things.
~~~~~~~~~~~~~~~~~~
So there! You've got the tools of the trade! And there's so much more that I don't even have or haven't mentioned. Buttons, crayons, colored pencils, markers, plastic cups, plastic table ware, canvas, chains, glitter, paper stock, tracing paper, and so much more! Just remember, anything can be a craft. :)
Now that you've got the tools you're going to need a space. Be sure it's a spot where you can work uninterrupted and be at ease. If you can't find a spot (because children can sometimes make you wonder if you accidentally bedded the devil) then my advise is to try and get the kids involved. Painting and coloring is fun for everyone, sit them down and put them to work to make art work for the walls and fridge. I personally like to turn on some music and get down to it zenned out on the 80's. But thats me, whatever works for you, do it and you'll make beautiful things I promise.
Now my current working space is a little bit of a... Well a natural disaster may or may not have been contained in that room at some point.
Family life and a combination of pets and laziness have left my craft room more of a holding cell for guests we don't like.
So I work out in the kitchen for now, which is less private but much more open as I can use the counters and dinning room table. I hate to preach after showing you a picture of the pig pen that's my Craft room but I do need to stress the importance of organization. Knowing where your tools are will save you a lot of frustration and grief down the line. At a later date I'll be doing a project involving organizing my room and you're free to join me when it begins if you have similar problems :)
The above is what I'm currently using for my Crafting area. A simple and light (easy to move) table and all my supplies are in easy to move containers. I'd say all of the containers together probably cost about $50-$80 but it was more then worth it.
So that's it then! You have your space, you have your tools. All you need now is ideas and drive! Till next time, when we will be doing a simple jump off craft tutorial on Basket Shelves. Till then, keep smiling and never hesitate to send me an email with an idea for a craft or recipe.
With Love~
Crafty Kitty =^.^=